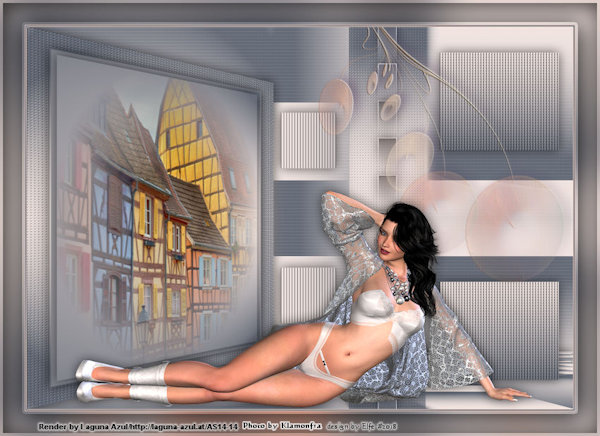
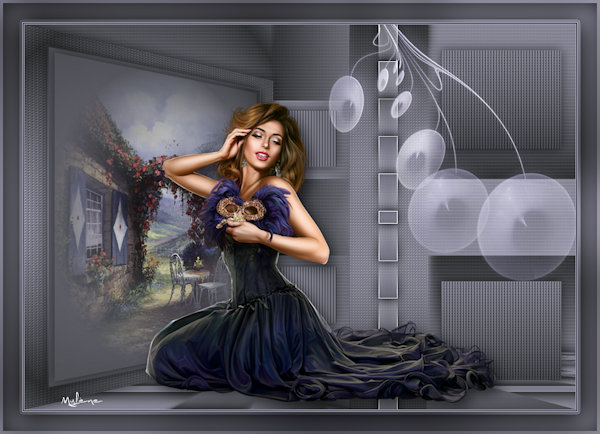
MATERIAIS 
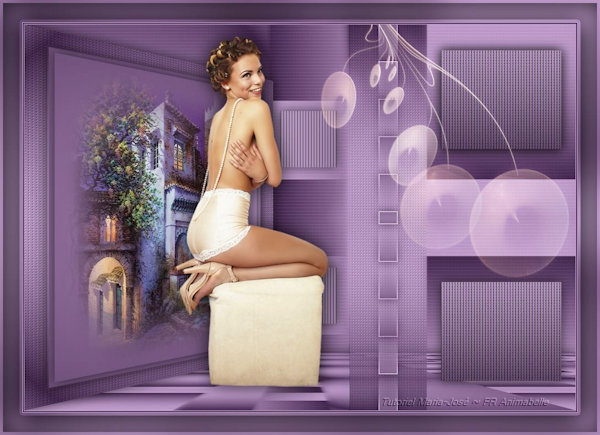
Um tube - Animabelle, agradeço

Um misted - MJ
Decos - MJ
Presets - Pick
**** Salvar os presets dentro da pasta Presets do PSP
Layer - Alpha Channel - momentheureux
PLUGINS
Penta
Mehdi
Graphics Plus
AP[Lines]SilverLining
FM Tiles Tools
Filters Unlimited2
Carolaine and Sensibility
MuRa's Meister
_________________________________________________________________________________
Preparar Gradiente - SUNBURST - cores a seu gosto
Angle 0 - Repeats 1 - Central Point H 0 - V 50 - Focal Point H 50, V 50
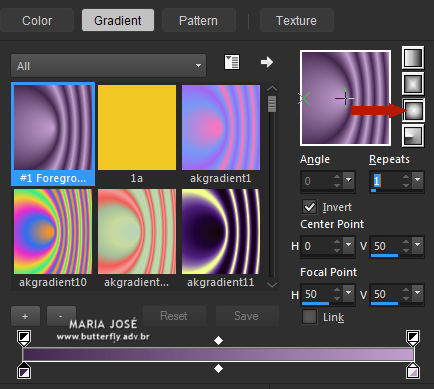
Nossas cores - Foreground #43274d - - Background #c29ece -
_________________________________________________________________________________
1.- Abrir - alphachannel_momentheureux - Faça uma cópia - fechar o original
Vamos trabalhar na cópia
_________________________________________________________________________________
2.- Preencher esta layer com a gradiente
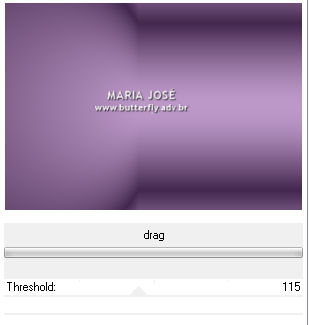
3.- Plugin - Penta - drag
_________________________________________________________________________________
4.- Selections - Load Selection From Alpha Channel - Selection #1
Promote Selection to Layer - Manter a Seleção
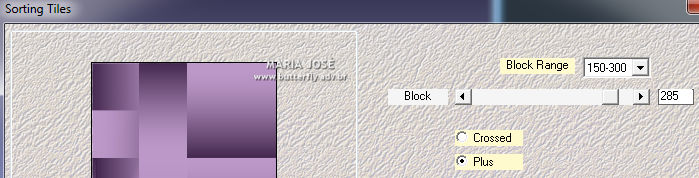
5.- Plugin - Mehdi - Sorting Tiles - Plus
DESELECIONAR
_________________________________________________________________________________
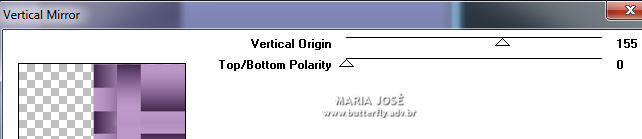
6.- Plugin - Graphics Plus - Vertical Mirror
7.- Selections - Load Selection From Alpha Channel - Selection #2
Promote Selection to Layer - Manter a Seleção
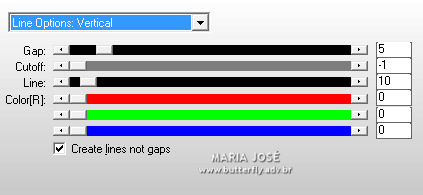
8.- Plugin - AP[Lines]SilverLining - Lines Options Vertical
DESELECIONAR
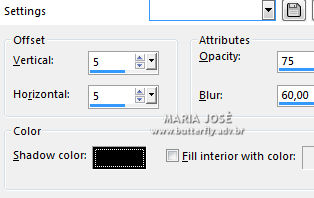
9.- Effects - 3DEffects - Drop Shadow 0, 0, 60, 30, preto
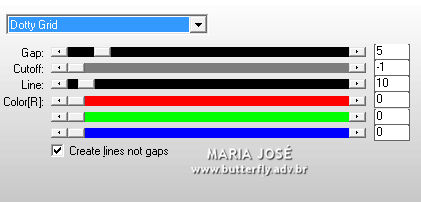
10.- Nesta mesma Layer - Plugin - AP[Lines] SilverLining - Dotty Grid
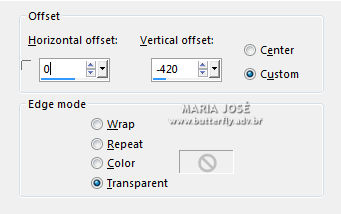
11.- Layers - Duplicate - Effects - Image Effects - Offset
_________________________________________________________________________________
12.- Ativar a Promoted Selection (2ª de baixo para cima)
13.- Selections - Load Selection From Alpha Channel - Selection #3
Promote Selection to Layer - Manter a Seleção
14.- Plugin - AP[Lines]SilverLining - Lines Options Vertical - mesma configuração
Repetir o Drop Shadow - DESELECIONAR
15.- Layers - Duplicate - Image Flip Vertical
_________________________________________________________________________________
16.- Ativar novamente a Promoted Selection (2ª de baixo para cima)
17.- Selections - Load Selection From Alpha Channel - Selection #4
Promote Selection to Layer - Manter a Seleção
18.- Plugin - AP[Lines] SilverLining - Dotty Grid - mesma configuração
DESELECIONAR
19.- Plugin - FM Tiles Tools - Blend Emboss - DEFAULT
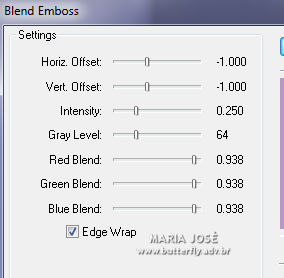
Baixar a opacidade entre 65 e 70%
_________________________________________________________________________________
20.- Edit - Copiar/Colar como nova layer - deco_11_01_mj
Layers - Arrange - Move Up 2 vezes
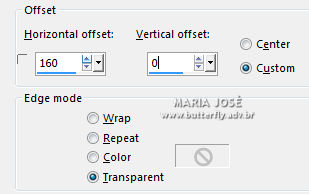
21.- Effects - Image Effects - Offset
Blend Mode - Luminance (L) ou outro a seu gosto
_________________________________________________________________________________
22.- Ativar a Promoted Selection (2ª de baixo para cima)
Layers - Merge Down
23.- Selections - Load Selection From Alpha Channel - Selection #5
Promote Selection to Layer - Manter a Seleção
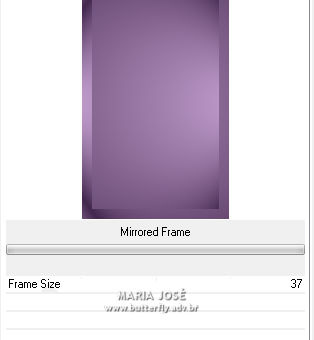
24.- Filters Unlimited2 - Buttons & Frames - Mirrored Frame - DEFAULT
25.- Selections - Modify - Contract 30 - Selection - Invert
26.- Plugin - AP[Lines] SilverLining - Dotty Grid (mesma configuração)
27.- Plugin - FM Tiles Tools - Blend Emboss - DEFAULT
Selection - Invert - Drop Shadow na mesma configuração
_________________________________________________________________________________
28.- Selections - Modify - Contract 10 - manter a seleção
Layers - Add New Layer
29.- Edit - Copiar/Colar o misted dentro da seleção
Se necessário baixar a sua opacidade - Repetir o Drop Shadow
DESELECIONAR - Layers - Merge Down
_________________________________________________________________________________
30.- Ferramenta Pick Tool - - teclar letra K - preset molduralateral_mj
Com o material
Desativar a ferramenta - teclar a letra M - Repetir o Drop Shadow
_________________________________________________________________________________
Ativar a Raster 1
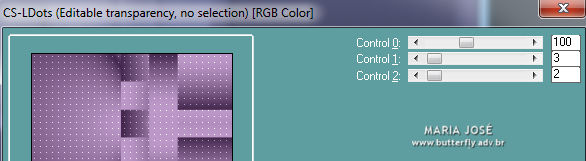
31.- Plugin - Carolaine and Sensibility - CS_LDots
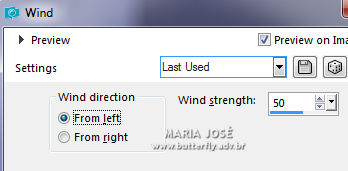
32.- Nesta mesma layer - Effects - Distortion Effects - Wind - From left
Layers - Duplicate
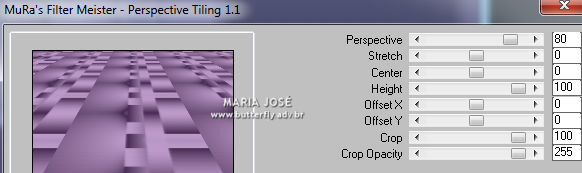
33.- Plugin - MuRa's Meister - Perspective Tiling - DEFAULT
34.- Ferramenta Pick Tool -- teclar letra K - preset piso_1_mj
Desativar a ferramenta - teclar a letra M - Image Mirror Horizontal
Repetir o Drop Shadow
_________________________________________________________________________________
35.- Edit - Copiar/Colar como nova layer - deco_11_01a_mj
Layers - Arrange - Bring to Top - Posicionar como no modelo
Blend Mode - Screen - ou outro a seu gosto
36.- Edit - Copiar/Colar o tube principal como nova layer - ver modelo
Drop Shadow critério pessoal
_________________________________________________________________________________
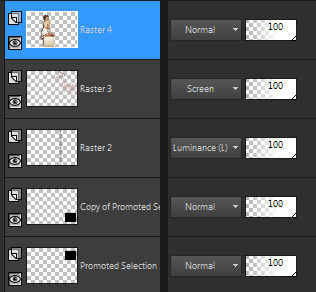
LAYERS - devem se apresentar assim

LAYERS - Merge Visible
_________________________________________________________________________________
BORDERS
37.- Imagem - Add Borders - 1px - cor clara
Imagem - Add Borders - 2px - cor escura
Imagem - Add Borders - 1px - cor clara
38.- Selections - Select All - EDITY COPY
Imagem - Add Borders - 40px - cor escura
Selections - Invert - Colar dentro da seleção a imagem copiada - item 38
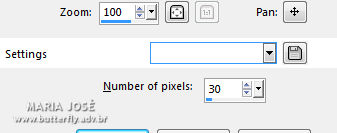
39.- Adjust - Blur - Gaussioan Blur - Radius 35,00
40.- Selections - Modify - Contract 5px
41.- Effects - 3DEffects - Cutout
DESELECIONAR
_________________________________________________________________________________
42.- Assinar o trabalho - Layers - Merge All Flatten
43.- Image - Resize - Width 1000px - Salvar em .jpg
Espero que apreciem, obrigada.
_________________________________________________________________________________
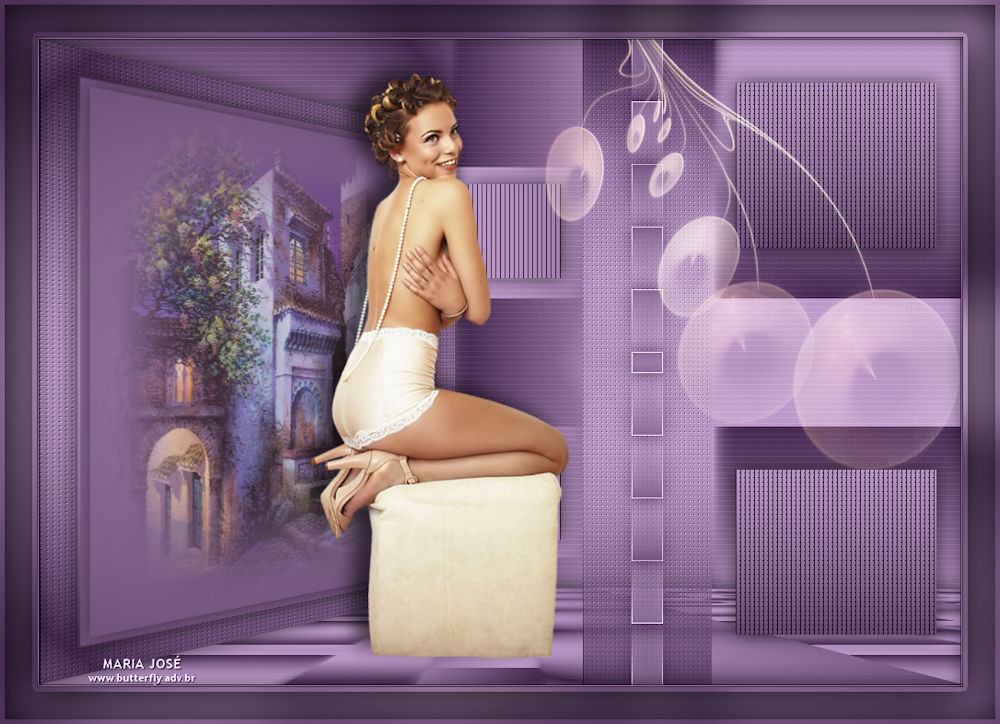
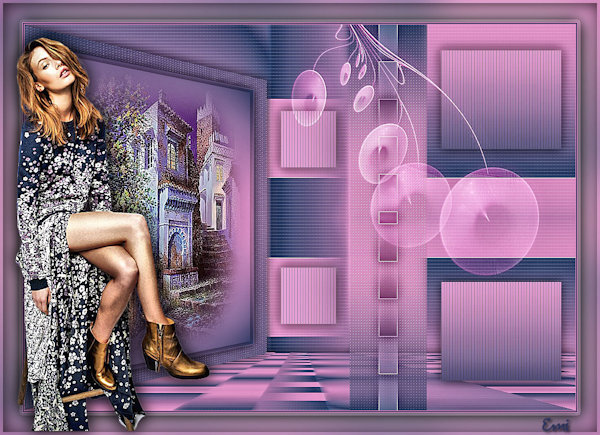
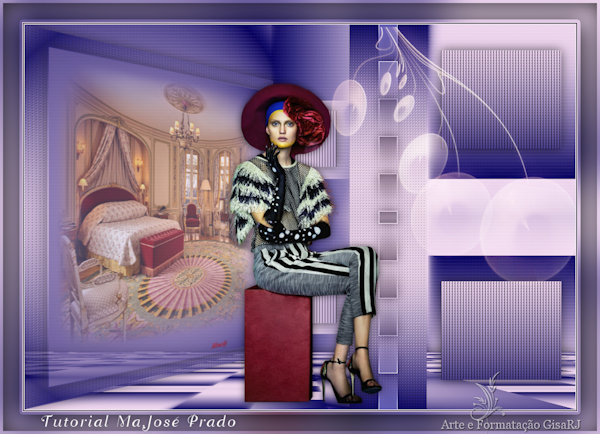
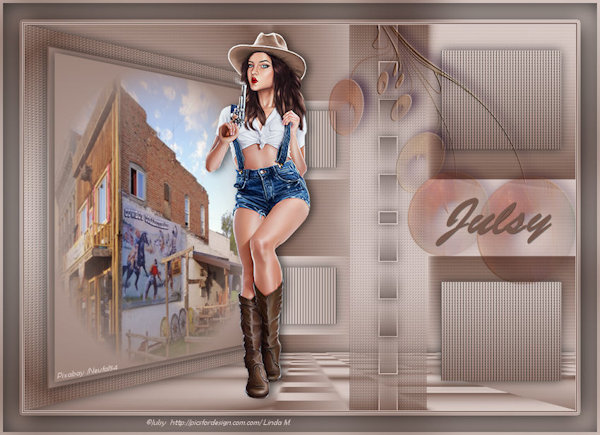
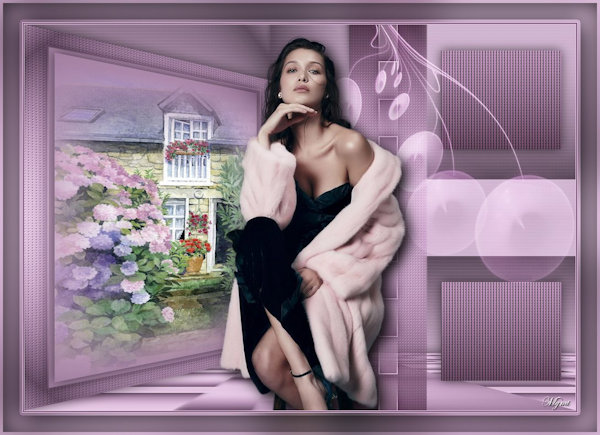
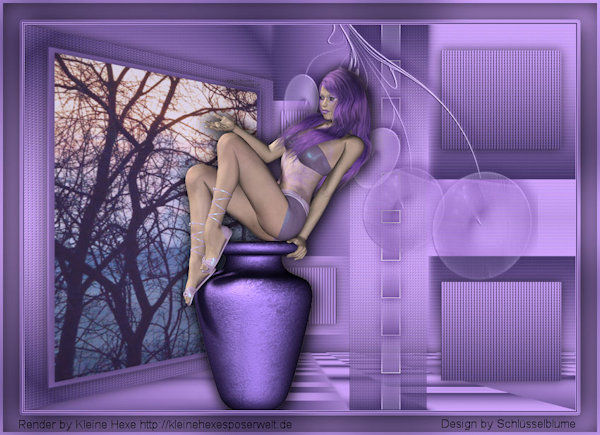
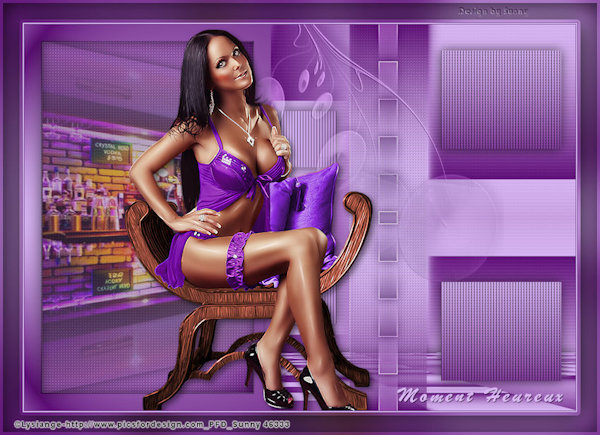
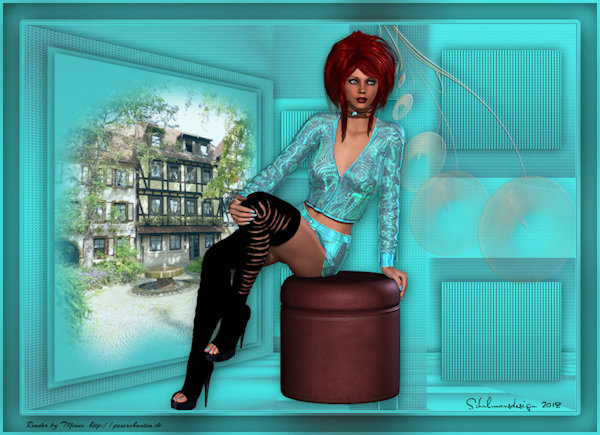
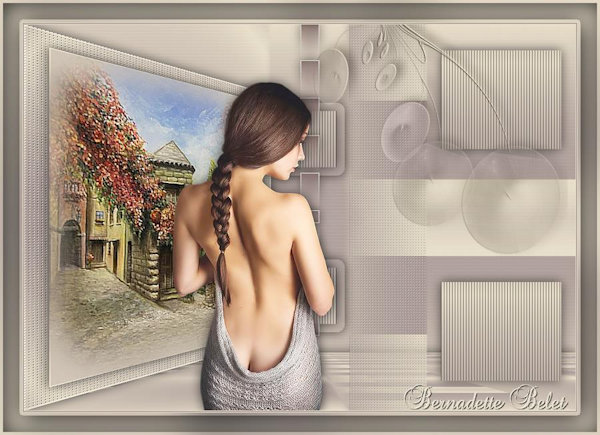
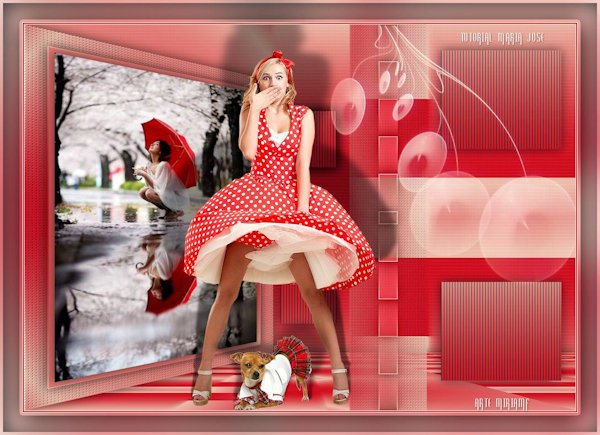
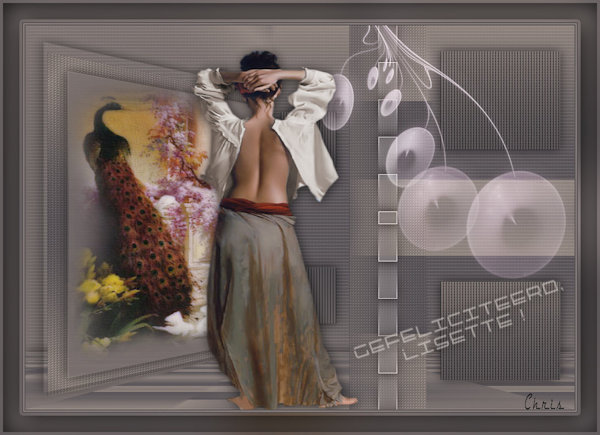
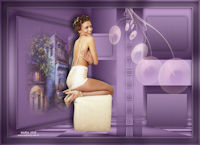
Outro modelo


Este tutorial foi criado em 12 de janeiro de 2018 por Maria José Prado. É protegido por lei de Copyright e não poderá ser copiado, retirado de seu lugar, traduzido ou utilizado em listas de discussão sem o consentimento prévio e escrito de sua autora acima declinada.
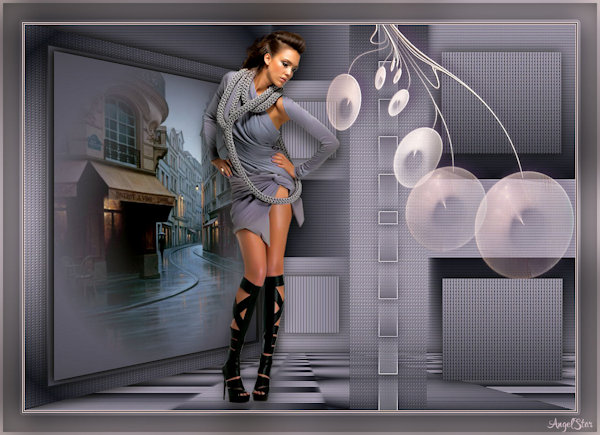
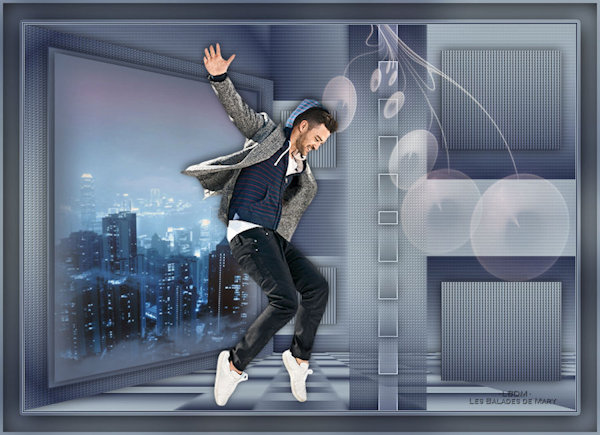
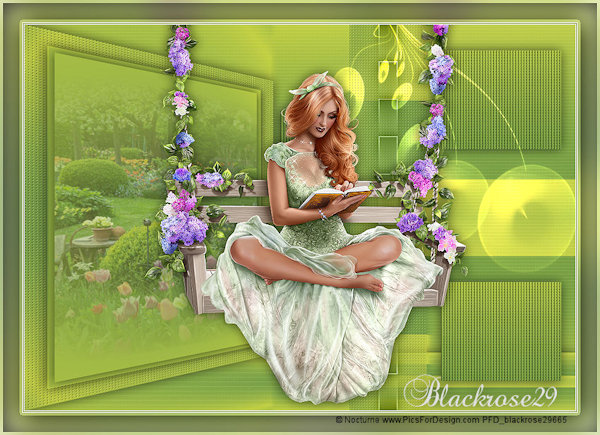
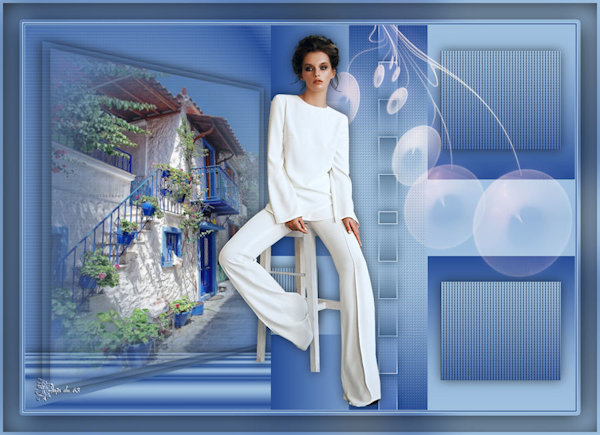
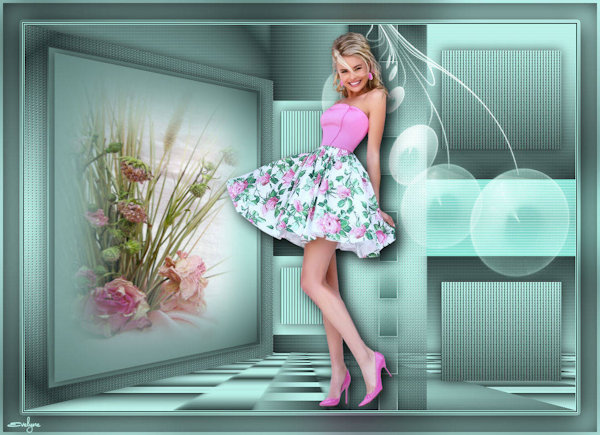
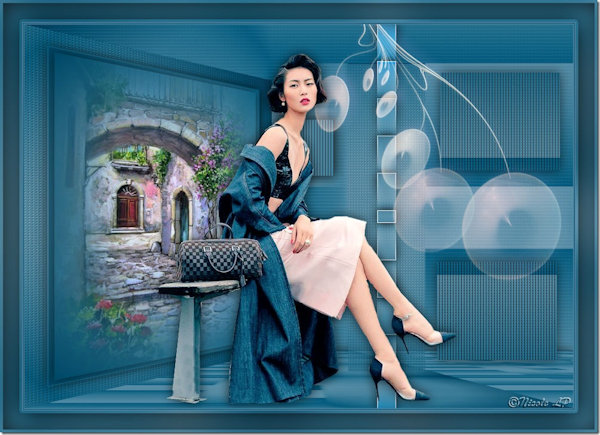
VARIANTES